عضویت
عضویت  ورود اعضا
 راهنمای خرید


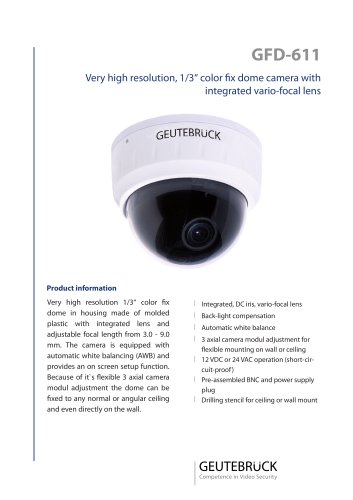
Monochrome Cameras GVK-3100 pages
Instruction manual
GVK-310 / GVK-310/DC
WARNING
To prevent fire or electric shock hazard, Do not expose this appliance to rain or
moisture.
RF EMISSIONS
This Class B digital apparatus complies with Canadian ICES-003.
Cet Appareil numérique de la classe B est conforme à la norme NMB-003 du
Canada.
Note: This equipment has been tested and found to comply with the limits for a
Class B digital device, pursuant to part 15 of the FCC Rules. These limits are
designed to provide reasonable protection against harmful interference in a
residential installation. This equipment generates, uses, and can radiate radio
frequency energy and, if not installed and used in accordance with the instructions,
may cause harmful interference to radio communications. However, there is no
guarantee that interference will not occur in a particular installation. If this
equipment does cause harmful interference to radio or television reception, which
can be determined by turning the equipment off and on, the user is encouraged to
try to correct the interference by one or more of the following measures:
- reorient or relocate the receiving antenna.
- increase the separation between the equipment and receiver.
- connect the equipment into an outlet on a circuit different from that to which
the receiver is connected.
- consult the dealer or an experienced radio/TV technician for help
PREFACE
CG series camera introduces a new high picture quality , high resolution and high
sensitivity 1/3 inch type interline transfer CCD image sensor.
The CG series cameras have been developed using the advanced technology of
Digital Signal Processing LSI ( DSP ) together with function control by DIP switch.
This series cameras is ideal for advance surveillance applications, or as an input
device for an mage processing system.
FEATURES
.. High sensitivity with minimum illumination needed for quality video.
.. Low image distortion and residual, withstanding electric and magnetic field
interference and mechanical vibration.
.. Applications: Surveillance, Monitoring and Security.
.. Excellent signal to noise ratio.
.. Accurate color reproduction and Excellence of Auto Tracing White balance
( ATW ) over a wide color temperature.
.. Aperture and color suppression under low light to reduce spectral and Chroma
noise.
.. Automatic electronic shutter provides „ 1,600 : 1, equivalent to 40 steps,
dynamic range to correct exposure, if a manual iris lens is used.
.. The following functions are built in :
1 ) Internal and line lock synchronizations.
2 ) Auto IRIS ( AI ) / Auto Electronic Shutter ( AES ).
3 ) Auto IRIS level adjust by Via-Resister.
4 ) Black Light Conversation ( BLC ).
.. The back focus adjustment function allows easy adjustment and installation.
.. Excellent picture quality
1 ) 2 edge ( vertical and horizontal ) picture enhancer for greater picture
sharpness.
2 ) New Chroma processing circuit for better color reproduction.
3 ) New concept ATW curve for good color emendation.
PRECAUTION
.. Do not attempt to disassemble the camera.
To prevent electric shock, do not remove screws, case or covers. There are
no user serviceable parts inside. Ask a qualified service person for serving.
.. Handle the camera with care.
Do not abuse the camera. Avoid striking, shaking, etc. The camera could
damage by any improper handing or storage.
.. Do not expose the camera to rain or moisture, or try to operate it in
wet areas.
Take immediate action if the camera becomes wet. Turn power OFF and
refer servicing to a qualified service person for servicing. Moisture can
damage the camera and also create the danger of electric shock.
.. Do not use strong or abrasive detergents when cleaning the camera
body.
Used a dry cloth to clean the camera when dirty. In case the dirt is hard to
remove, use a maid detergent and wipe gently.
1
.. Clean the CCD faceplate with care.
Do not clean the CCD with strong or abrasive detergents. Use lens tissue or a
cotton tipped applicator and ethanol.
.. Never face the camera towards the sun.
Permanent damage may occur when subjected to intense light. Whether the
camera is in use or not. Use cautiously when operating any electrical device.
Keep the camera out of the direction of spotlights and light reflecting objects.
.. Do not operate the camera beyond the specified temperature, humidity
or power source ratings.
Do not use the camera in an extreme environment where high temperature or high
humidity conditions exist. Use the camera under conditions where temperatures
are within -10Ž ~ + 50Ž , and humidity is below 80% relative humidity. The
input power source is 220V ~ 240V AC for AC230V model and DC12V/AC24V ±
20% for AC24V model camera.
.. Do not touch the CCD sensor with your fingers. If necessary, use soft
cloth moistened with alcohol to wipe off the dust.
.. When the camera is not in use, keep the cap on the lens to protect the
CCD sensor.
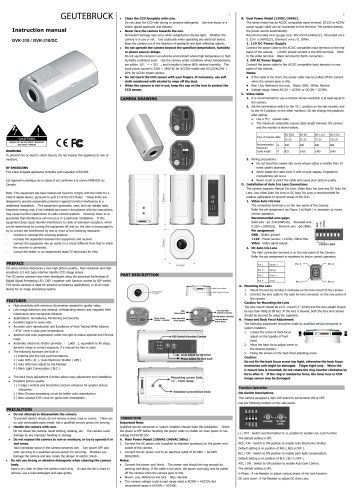
CAMERA DRAWING
PART DESCRIPTION
CONNECTION
Important Note:
Qualified service personnel or system installers should make the installation. Check
the power is OFF before handling the power cable no matter AC main power or low
voltage AC24V/DC12V.
A. Main Power Model (100VAC-240VAC 50Hz) :
1. Connect the AC power cord (supplied as standard accessory) to the power cord
socket of the camera.
2. Connect the AC power cord to an electrical outlet of AC100V ~ AC240V
50Hz/60Hz.
Notes:
.. Connect the power cord firmly. The power cord should be long enough for
panning and tilting. If the cable is too short, the power cord plug may be pulled
off the camera when the camera pans or tilts.
.. Brown: Live, Reference line lock. Blue: Neutral.
.. This camera voltage could accept range rated is AC90V ~ AC253V. But
recommend range is AC100V ~ AC240C.
2
B. Dual Power Model (12VDC/24VAC).
The series model has an AC/DC compatible input terminal. DC12V or AC24V
power supply cable can be connected to this terminal. The camera detects
the power source automatically.
Recommended wire gauge size. Ö0.65mm(AWG22), Stranded wire
0.32m ‡u(AWG22), Element wireö0.18Min.
1. 12V DC Power Supply
Connect the power cable to the AC/DC compatible input terminal on the rear
panel of the camera. +12VDC should connect is the RED terminal. 0VDC
to the white terminal. Black terminal for Earth connection.
2. 24V AC Power Supply
Connect the power cable to the AC/DC compatible input terminal on rear
panel of the camera.
Notes:
.. If the cable is too short, the power cable may be pulled off the camera
when the camera pans or tilts.
.. Red: Live, Reference line lock, Black: GND,. White: Neutral.
.. Voltage range: Rated AC12V ~ AC29V. or DC10V ~ DC30V.
C. Video Cable
1. It is recommended to use a monitor whose resolution is at least equal to
the camera.
2. Set the termination switch to the 75Ù position on the last monitor, and
to the Hi-Z position on the other monitors. Do not change the positions
after setting.
a. Use a 75Ù coaxial cable.
b. The maximum extensible coaxial cable length between the camera
and the monitor is shown below.
RG-59/U RG-6U RG-11/U RG-15/U
Type of Coaxial cable
3C-2V 5C-2V 7C-2V 10C-2V
Recommended m 250 500 600 800
Maximum
Cable length ft 825 1650 1980 2640
3. Wiring precautions:
.. Do not bend the coaxial into curve whose radius is smaller than 10
times cable’s diameter.
.. Never staple the cable even if with circular staples. Impedance
mismatching will occur.
.. Never crush or pinch the cable and cause poor picture quality.
D. Installation of Auto Iris Lens Connections
The camera supports Manual Iris Lens, Video Auto Iris Lens and DC Auto Iris
Lens. Use Video Auto Iris Lens or DC Auto Iris Lens is recommended for
outdoor application to prevent smear of the CCD.
1. Video Auto Iris lens
The connection terminal is on the rear panel of the Camera.
Refer the pin assignment (as Figure 1 at Right ) is necessary to insure
correct operation.
Recommended wire gage:
Solid wire : ö1.2mm(AWG16), Stranded wire :
0.25m ‡u(AWG16), Element wire : ö0.18Min.
Pin assignment
GND : Shield, ground.
+12V : Power source; +12VDC, 50mA Max.
Video : Video signal output.
2. DC Auto Iris Lens
The 4pin connection terminal is on the rear panel of the Camera.
Refer the pin assignment is necessary to insure correct operation.
G. Mounting the Lens
1. Mount the lens by turning it clockwise on the lens mount of the camera.
2. Connect the lens cable to the auto iris lens connector on the rear panel of
the camera.
Caution for Mounting the Lens
The lens mount should be a CS –mount (1”-32UN) and the lens weight should
be less than 450g (0.99 lbs). IF the lens is heavier, both the lens and camera
should be secured by using the supporter.
H. Focus and Back Focal Adjustment
The following adjustment should be made by qualified service personnel or
system installers.
1. Loosen the screw of back focus
adjust on the topside of front
head.
2. Move the back focus adjust screw to
the desired position.
3. Fixing the screws on the back focal adjusting screw.
Caution:
Do not fix the back focus screw too tight, otherwise the back focus
mechanize unit might be damaged. Finger tight only. When the
C-mount lens is mounted, do not rotate the ring Counter clockwise by
force after it. If the ring is rotated by force, the inner lens or CCD
image sensor may be damaged.
Function Operation
Dip Switch Descriptions
This camera equipped a 4pin DIP switch to set function ON or OFF.
Use the following buttons on the side panel.
LL / INT : Switch synchronization to LL position to enable Line Lock function.
The default setting is INT.
AES / ON : Switch to ON position to enable Auto Electronics Shutter.
Default setting is on position of AES ( AES is OFF ).
BLC / ON : Switch to ON position to enable back light compensation.
Default setting is on position of BLC ( BLC is OFF ).
AGC / ON : Switch to ON position to enable Auto Gain Control.
The default setting is ON.
V-Phase : A via-Resister to adjust vertical phase of line lock function.
DC Lens Level : A Via-Resister to adjust DC drive Lens.
I
RISK OF ELECTRIC SHOCK
DO NOT OPEN
CAUTION
CS Lens mount,
1"-32 UNF
Back Focus Adjust
Back Focus Fix Screw
Mounting screw hole,
¼", 7mm deep.
Rotation preventive hole
Pin 1 Damp +
Pin 2 Damp -
Pin 3 Drive +
Pin 4 Drive - Pin 1
Pin 2 Pin 3
Pin 4
DIP Switch Function Control
Level Adjust for DC Drive
Phase Adjust for Line Lock
DC Auto IRIS
Output Connector
BNC,
Video Output
Terminal Block,
Power Input
Video Auto IRIS
Drive Output.
LED Power Indicated
Power Input.
110VAC ~ 240VAC
VIDEO LENS
GND
+12V
VIDEO