عضویت
عضویت  ورود اعضا
 راهنمای خرید


General technical0 pages

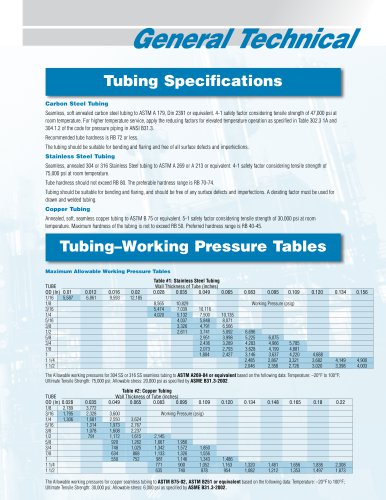
General Technical
Assembly
Brennan Tube Fittings are shipped completely assembled and finger-tightened. They are ready for
immediate use. Disassembly before use can result in dirt or foreign material getting into the fitting,
which can cause leaks. Brennan Tube Fittings are installed in three easy steps:
Step 1
Insert the tubing into the Brennan Tube Fitting. Make sure that the tubing rests firmly on the shoulders
of the fitting and that the nut is snug-tight. In this position, the tube does not rotate by hand.
Step 2
Before tightening the Brennan nut, scribe the nut at the 9 o’clock position.
Step 3
While holding the fitting body steady with a backup wrench, tighten the nut 1-1/4 turns*.
Watch the scribe mark and make one complete revolution. Then continue turning to the 12 o’clock
position.
* For 1/8" and 3/16" size tube fittings, only 3/4 turns from finger-tight is required.
Reassembly Instructions
Insert tube into fitting body and hand tighten. Using wrench, rotate the nut approximately 1/4 turn to
original 1-1/4 turns position. Then snug slightly with wrench.
Pre-Swaging
Sometimes, Brennan Tube Fittings must be installed in cramped quarters or overhead where ladders must be used. It is usually advantageous to use a
pre-swaging tool on the tubing in an open ground area, thus pre-swaging the ferrules onto the tubing. The tubing is then removed from the pre-swaging
tool. The tubing (with nut and pre-swaged ferrules) can now be attached to the fitting merely by following the reassembly instructions.
Step1
Assemble the Brennan nut and ferrules to the pre-swaging tool. Insert the tubing until it bottoms out in the fitting body. Then tighten the nut 1-1/4 turns.
Step 2
Loosen the nut and remove the tubing with the pre-swaged ferrules from the pre-swaging tool.
Step 3
The connection can now be made simply by snug-tightening the nut as described in the retightening instructions.
Brennan hydraulic swaging units are now available in 1/2", 5/8", 3/4" and 1" sizes. For further information, consult your local Brennan sales and service
representative.
Brennan Gap Inspection Gages
Brennan Gap Inspection Gages are designed to assure that a fitting has been sufficiently pulled up. They are particularly useful in systems where fittings
are to be tightened in difficult or inaccessible locations, as well as systems where insufficient pull-up could cause potentially dangerous or expensive
consequences.
Brennan Gap Inspection Gages are inserted between the nut and body of a tube fitting after make-up. If the gage will fit in the gap between the nut and
body hex, the fitting nut has not been sufficiently tightened.
Gap inspection gages cannot distinguish the overtightening of a fitting from proper make-up.
Gap inspection gages should be used only for initial make-ups and are not to be used in subsequent remake assemblies.
B r e n n a n
I n d u s t r i e s
Atlanta • Cleveland • Dallas • Los Angeles • Seattle
NOTE:
Brennan has a dynamic Research
& Development
program for the
development of fittings
in different materials,
higher pressures and
temperatures. The
dimensions and information given
in this catalog are
subject to change
without notice
as a result of
this research and
development.